If you have ever tried to downscale an image using a web browser and its canvas, you noticed that it starts to look like it’s been through a grinder or something. We at Uploadcare have rebelled against the unattractive thing and decided to deal with it.
Another thing is that websites and mobile apps are in want for smaller images. Because having those fancy phones in hand, users upload kittens and stuff in excessive sizes and resolutions.
Unfortunately, uploading pictures from your camera often means larger images = more storage = greater outgoing traffic. These factors might be quite a problem for mobile devices, speaking of which you still get to pay for the traffic while utilizing some crummy connection. Truth is, high resolutions are often excessive, and plenty of sites and mobile apps have to downscale every input image to much smaller resolutions. All told, large images lead to extra routines for developers and often are a waste of money for many users.
We are constantly fighting image-file injustice. Hence, one of our solutions is to downscale images before uploading them (i.e. on a client). Client-side image resize is what we have implemented into Uploadcare Widget already. It wasn’t easy but the difficulties were overthrown in the end. Here’s how it went.
Downscaling is simple and only takes three ingredients: an image, a browser and it’s built-in element called canvas. Five lines of code and we’re there:
function resizeImage(img, width, height) {
  var canvas = document.createElement('canvas');
  canvas.width = width;
  canvas.height = height;
  canvas.getContext('2d').drawImage(img, 0, 0, width, height);
  return canvas;
}
Now once we’re done downscaling an image we’re free to do with it whatever comes to mind. Wait-wait, something wicked has just happened to its visual quality — it degraded.
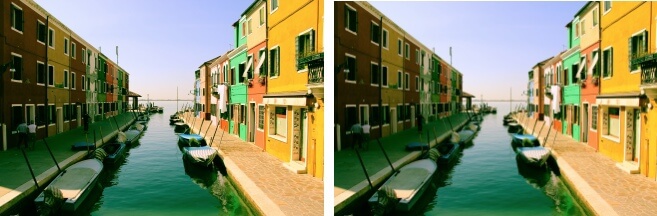
 Original image vs resized version comparison after downscaling
The original image (to the left) and its resized version (to the right).
Here’s why the quality changed for the worse, current desktop and mobile browsers use a visually poor resizing algorithm, its essence is in interpolating four points of an input image into a single point of the output. Because of the significant reduction, not all of the input pixels are represented in the output, which also leads to data loss and aliasing.
So, is that our destiny to use such a scatterbrained algorithm or are we able to somehow fight this baloney back? The answer is yes, we are! The first thing to try is to organize a step-sequence of smaller downscales (i.e. multiple downscaling passes), like in this example.
Since we know that browser uses exactly four pixels of the input image, we shouldn’t be using random scaling factors. Instead, we’d better focus on a factor of two, which is equivalent to supersampling in the case.
Another hassle is that the probability of reaching a needed target size by using dual fold downscales is equivalent to finding a four-leaf clover on Mars. So, it often happens that the last scaling step has to use different scaling factors. Tiny ones will result in an overblurred image, and so forth.
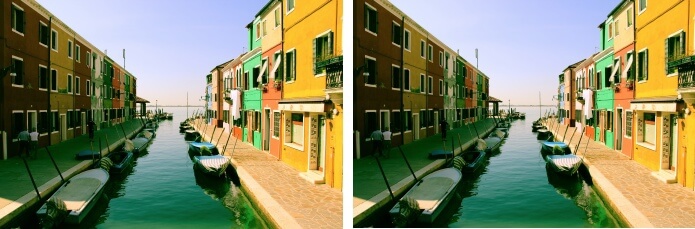
 An overblurred image after resize example
The image to the right is what happens when you try to downscale an image by just a single pixel, see original btw.
The good news is that browsers allow us to use lightning-fast instruments like JavaScript to build whatever we want, including scaling algorithms. And in the end, downscaling-done-right seems pretty complicated, what if we just load a full-res image into a canvas? Like this:
function resizeImage(image, width, height) {
  var cIn = document.createElement('canvas');
  cIn.width = image.width;
  cIn.height = image.height;
  var ctxIn = cIn.getContext('2d');

  ctxIn.drawImage(image, 0, 0);
  var dataIn = ctxIn.getImageData(0, 0, image.width, image.heigth);
  var dataOut = ctxIn.createImageData(width, heigth);
  resizePixels(dataIn, dataOut);

  var cOut = document.createElement('canvas');
  cOut.width = width;
  cOut.height = height;
  cOut.getContext('2d').putImageData(dataOut, 0, 0);
  return cOut;
}
Not in a million years! While it’s fairly fine with desktops, it won’t work with the majority of mobile browsers at all. The catch is in the mobile browsers canvas size limitations imposed by software developers in order to maintain quick and responsive workflow.
All told leads to a maximum canvas size of 5 MP in a mobile Safari browser while the size of the photos you’re able to shoot with your fancy iPhone starts at 8 MP and skyrockets up to 60+ MP in the panoramic mode (BTW, the above code block uses about 96 MB of RAM for a 8 MP image and that’s a whole lot).
Okay, so how do we adapt to such limitations? Instead of full-sized images we use their fractions. We can load the first small chunk of an image, then one more and so on, until we reach the last step of loading the tail of an image (of some resolution). This recipe lets us halve memory usage (48 MB RAM for a 8 MP image and 2 MP chunk size).
Sadly, in the browsers where jit-compiling is not supported (e.g. pre-48 Google Chrome on iOS), the procedures might be executed at a snail’s pace. In certain browsers visual artifacts and other kinds of glitches may appear when trying to run the procedure. Spoiler: a more efficient and reliable solution will follow. In the meantime, let’s get back to the blur problem.
It’s about that sequence of downscales again and the last-step-scaling factor hangup. The fix for enhancing the algorithm might be found by looking from a different angle. For example, it can be refined by changing the order of steps, making the last one come first. Logicality changes then, firstly we scale down an image by some needed factor and then we start the progression of dual fold downscales. Here is an example of such approach. The following pictures indicate that a visual quality of the image changes depending on the number of downscaling passes. Our goal was to achieve a more stable result.
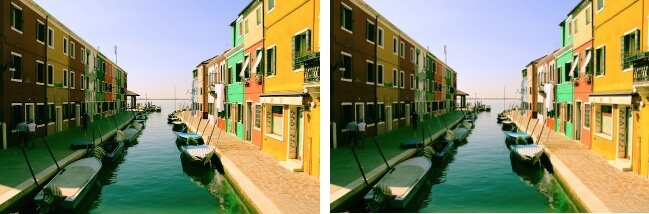
 4 vs 5 downscaling steps in image processing
4 downscaling steps (to the left) vs 5 downscaling steps (to the right).
 2 vs 3 downscaling steps for same image
2 downscaling steps (to the left) vs 3 downscaling steps (to the right).
It has already been said that cases, where a target size of an image can be achieved through a progression of dual fold downscales, are rare. This means that another solution should be found to avoid extremely sharp or blurred images. In this part of the article, we’d like you to think for awhile, keeping in mind that a factor of 2.0 is the best fit. Say, for example, if the image should be downscaled 7.5 times to reach a target size, why not set the downscaling factor to 7.5 ** (1/3), ~1.94. The problem here is to build an optimal algorithm that will suit as many cases as possible. Think of that.
Truth be told, a common case is having plenty of images to downscale. And this can be tricky too.
One part of the problem is that if we rush straight ahead and resize a good deal of images in a row, a browser will just freeze up until the very end of the procedure. We use setTimeout() after each step to keep workflow responsive.
Another issue is memory usage. The more images are processed simultaneously the greater gets RAM consumption. This can be avoided by using queuing.
Here goes the example of batch image resizing, containing all the cool features like timeouts and queuing. But even this one is imperfect since it lacks proper memory management. Yup, the truth is you shouldn’t rely on garbage collection alone. Keep in mind that wholesome concept — free up memory whenever it’s possible and allocate it only when it’s needed critically. Here goes the memory-managed example which allows an iPhone with 512 MB RAM to handle 50+ images in a row.
As you can see, client-side image downscaling is Frankenstein in the flesh, an ugly native resize is used multiple times to achieve at least a glimpse of visual quality. Browsers eat resources out, memory leaks, magic doesn’t work. What a mess! Oh yeah, there’s another thing adding fuel to it — writing initial EXIF to a downscaled output to preserve its orientation and metadata.